Today I am back with my second mani in the Falling For Nail Art Challenge; Early Sunsets.
As you know, in the fall it starts to get darker a lot earlier. I hate it. Over the summer I had started exercising by going on walks/jogs in the evening and that time will be coming to a close with the new weather. Hopefully I will be motivated enough to go to the gym.
Anyway, here is my Early Sunset mani:
Polishes Used:
-OPI - Alpine Snow
-Sinful Colors - Rain Storm
-China Glaze - Electric Beat
-Sinful Colors - Unicorn
-Black Acrylic Paint
-Glisten & Glow - HK Girl Topcoat
I went for the look of trees with their leaves starting to fall off silhouetted against the darkening skys. I hope you can see what I was going for here. I felt like Bob Ross while I was painting this one, hehe. (I used to watch his show all the time, lol, he made painting look so easy).
I hope you like this look and make sure to check out what everyone else participating in the challenge created as well.
P.S. This challenge is open to everyone, if you don't have a blog, you can post wherever you want using the hashtag, #fallingfornailart.
9.25.2013
9.24.2013
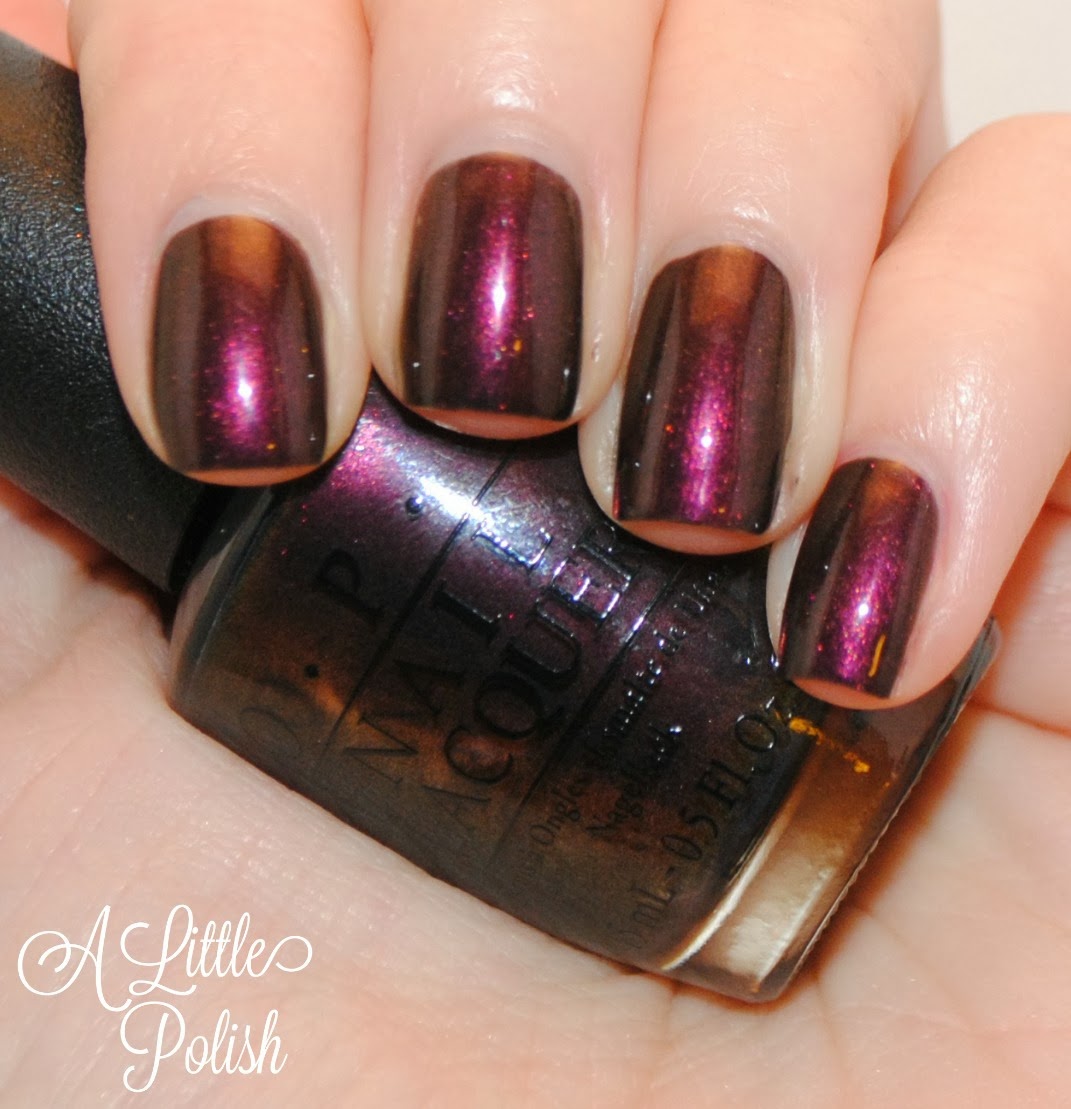
OPI - Muir Muir On The Wall
Over the weekend I decided to use my Ultra coupon and pick up a couple of polishes. One that I grabbed was Muir Muir On The Wall. I absolutely love this shade!!!
Vampy colors are perfect for fall and now that it is officially fall, I can start wearing them all the time!!
Polishes Used:
-OPI - Nail Envy
-OPI - Muir Muir On The Wall
-Glisten & Glow - HK Girl Topcoat
I am wearing two coats of MMOTW here. I love all the different shimmers in this shade, it looks black, brown, burgundy, purple, gold. lol. Just gorgeous for the season. I plan on wearing this to work a lot this season!
Did you pick up any of the shades from the San Francisco Collection? I only have this one so far but may be heading back to the store to grab a couple more.
share this post » |
{Facebook} | {Twitter} | {Pinterest} |
9.23.2013
Press Release - China Glaze Monsters Ball
COME ONE, COME ALL: YOU’RE INVITED TO THE MONSTERS BALL
China Glaze® Introduces Six Limited Edition Shades for Halloween 2013
This October, you’re invited to celebrate with the ghosts and ghouls at the darkly decadent Monsters Ball, hosted by China Glaze®. Attended by spooky sparkles and tantalizing textures, you’re sure to have a hauntingly good time with this limited edition six-piece collection shrouded in mystery and dripping with lavish color.
Dance the night away in six colors and finishes perfect for All Hallows Eve:
- Howl You Doin’: Shadowy purple glitter
- Bat My Eyes: Ominous gold glitter
- Boo-Gie Down: Multi-sized orange, black and white glitter
- Fang-Tastic: Mysteriously mixed up green, blue and magenta glitter
- Bump In The Night: Hair-raising black texture
- Ghoulish Glow: Glow-in-the-Dark top coat
Ideal for creating holiday manicures that are a true work of art, the China Glaze® Monsters Ball display features artwork by renowned artist Abigail Larson, best known for her illustrations inspired by the various things that go bump in the night.
China Glaze® Monsters Ball will be available in October 2013 at fine salons and beauty supply stores.
China Glaze® is free of DBP, toluene, and added formaldehyde.
China Glaze® nail lacquers are available through salons and professional beauty supply stores nationwide. For more information, please visit www.chinaglaze.com or follow China Glaze on Facebook (@ChinaGlaze), Twitter (@ChinaGlazeOfficial), Instagram (@ChinaGlazeOfficial), Pinterest (pinterest.com/chinaglaze) and YouTube (youtube.com/chinaglazeofficial).
share this post » |
{Facebook} | {Twitter} | {Pinterest} |
Tawdry Terrier - Press Release

To see an online version of this press release, please click here.

To celebrate a Tawdry Terrier family birthday, on September 24 we will be giving away a free bottle of Tawdry Terrier "Ally-Gator's Swamp Dawg" to all customers who purchase two or more polishes at our Etsy shop. Any remaining stock after September 24 will be listed for sale.

Tawdry Terrier "Ally-Gator's Swamp Dawg" is a lime green metallic glass fleck polish with a mix of purple, orange, and green glitter.
Tawdry Terrier offers custom blended polish, using a 5-free formula containing cosmetic-grade mica and glitters. All polishes are limited edition.
Follow our blog, and follow us on Facebook, Twitter, Tumblr, Instagram, Pinterest, Google Plus, and BellaShoot.
Happy polishing!
The Tawdry Terrier Team
share this post » |
{Facebook} | {Twitter} | {Pinterest} |
Incoco Real Nail Polish Appliques Review
When I was contacted by Incoco to do a product review for them I thought to myself, "HECK YES", but I calmed replied and let them know which shades I wanted to try. I had seen so many positive reviews of Incoco Appliques and couldn't wait to try them out for myself.
I received two shades, Ballerina Princess and Into The Deep. I couldn't wait to get the appliqués onto my nails that I accidentally forgot to take pictures of the process, lol, but don't worry, when I wear my second pack I will try to take pictures of the process. PS. There are a TON of designs to pick from, including plain, glittery, French, etc.
I decided to start with Ballerina Princess, which is a "delicate silver etching pattern winds across an ombré of pink and lavender like a ballet shoe ribbon!"
The instructions are very easy, before you get started, clean, shape, and buff your nails before application. Note that you can stretch the strips gently for the perfect fit.
Step 1: Remove Cover
Step 2: Peel Polish
Step 3: Remove Silver Tabs
Step 4: Apply Polish
Step 5: Remove Excess
Here are the strips right after I applied:
I wore these for 6 days. I could have kept on wearing them because there was very minimal tip wear and they weren't peeling at all. In fact, the only reason that I took these off was because I needed to do some nail art for a couple of my nail art challenges. Here are the pictures from Day 6:
As you can see, these were wearing like iron. When I put the second set of appliques on I will make sure to have a couple blog posts lined up so I can wear them even longer.
A couple additional tips from Incoco:
-For best results, clean & buff nails before application. Push back cuticles.
-Use immediately after opening. Air will cause the nail polish to dry.
-Don't worry about making mistakes, as the strips can be repositioned.
-Stretch strips gently for a perfect fit.
-Apply thumbs last as you'll use them often during application.
-Remove with nail polish remover.
Overall, I would absolutely recommend these strips and once I am done with my second set, I will be purchasing more for myself, although I change my nails almost daily, these will be perfect for busy weeks, vacations, business trips, etc.
You can find Incoco here:
-Website
-Facebook
-Twitter
-Pinterest
-Instagram
-You Tube
Make sure to stay tuned for my second set :)
I received two shades, Ballerina Princess and Into The Deep. I couldn't wait to get the appliqués onto my nails that I accidentally forgot to take pictures of the process, lol, but don't worry, when I wear my second pack I will try to take pictures of the process. PS. There are a TON of designs to pick from, including plain, glittery, French, etc.
I decided to start with Ballerina Princess, which is a "delicate silver etching pattern winds across an ombré of pink and lavender like a ballet shoe ribbon!"
The instructions are very easy, before you get started, clean, shape, and buff your nails before application. Note that you can stretch the strips gently for the perfect fit.
Step 1: Remove Cover
Step 2: Peel Polish
Step 3: Remove Silver Tabs
Step 4: Apply Polish
Step 5: Remove Excess
Here are the strips right after I applied:
I wore these for 6 days. I could have kept on wearing them because there was very minimal tip wear and they weren't peeling at all. In fact, the only reason that I took these off was because I needed to do some nail art for a couple of my nail art challenges. Here are the pictures from Day 6:
As you can see, these were wearing like iron. When I put the second set of appliques on I will make sure to have a couple blog posts lined up so I can wear them even longer.
A couple additional tips from Incoco:
-For best results, clean & buff nails before application. Push back cuticles.
-Use immediately after opening. Air will cause the nail polish to dry.
-Don't worry about making mistakes, as the strips can be repositioned.
-Stretch strips gently for a perfect fit.
-Apply thumbs last as you'll use them often during application.
-Remove with nail polish remover.
Overall, I would absolutely recommend these strips and once I am done with my second set, I will be purchasing more for myself, although I change my nails almost daily, these will be perfect for busy weeks, vacations, business trips, etc.
You can find Incoco here:
-Website
-You Tube
Make sure to stay tuned for my second set :)
share this post » |
{Facebook} | {Twitter} | {Pinterest} |
Subscribe to:
Posts (Atom)


share this post »